
Renovation is a magic trick and choreography. You redesign walls, swap finishes, and dream in paint chips, then turn on the light to see how the ambiance changes. A good layout can shape a place, flatten colours, and make daily tasks dramatic. The incorrect picks? Glare-y, flat, and “why does this feel off?””
If you want your renovation to glow, not just glow up, sidestep these classic lighting mistakes with a few insider moves that pros swear by.
Stop Depending on a Lone Overhead Light
A single, centered ceiling fixture is the quickest way to invite shadows and eye strain. Rooms aren’t stage sets lit by a solitary spotlight; they’re layered environments where different tasks and moments need different wattage and direction.
Consider three levels. Set the tone with ambient lighting (recessed cans, ceiling-mounts, soffit, cove). Task lighting (pendants over islands, under-cabinet strips, reading chair swing-arm) illuminates action areas. Picture lights, wall washers, and toe-kick LEDs give drama and depth. These layers dim and increase, turning your room from “lit” to “lived-in.”
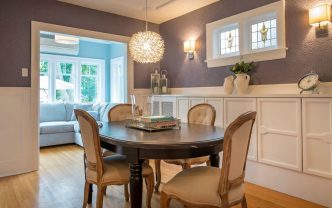
Scale Matters: Right-Size Every Fixture
Even a gorgeous fixture can look wrong if it’s the wrong size. Too small and it whispers into the void; too large and it swallows the room.
A quick designer rule of thumb: add the room’s length and width in feet to get a chandelier diameter in inches that feels proportional. For dining tables, aim for a fixture that’s roughly one-half to two-thirds the table width, so it anchors the setting without feeling oppressive. Over kitchen islands, two or three pendants usually beat one giant one—balance the diameter, spacing, and sightlines so they don’t crowd each other or block conversation. In hallways and entries, check door swing clearances and ceiling heights; a fixture that’s perfect in a catalog can feel hulking once installed.
Placement Is Everything: Aim, Height, and Spacing
Lighting is a game of angles. Place it wrong and you’ll get raccoon shadows in the bath, glare on the TV, and hot spots on countertops that look harsh in photos and in life.
Tuck under-cabinet lighting towards the front rail to illuminate kitchen work surfaces. Pendants over islands hang 30–36 inches above the counter; adapt for higher ceilings or larger shades. To avoid shadows, surround bathroom mirrors with sconces 60 to 66 inches to centre. If you must use a bar above the mirror, consider diffused light and keep it close to the wall. For recessed lights, consider beam spread and spacing so light cones overlap softly. Too few can produce dark pockets, too many make a ceiling look like a runway.
Aim matters too. Washing a wall of art or skimming a rough surface with adjustable trimmings and swivel heads brings paint and materials to life. To decrease glare, keep fixtures out of direct sightlines and avoid installing downlights directly over chairs, which can generate harsh overhead shadows.
Dim the Drama: Why Dimmers Belong in Most Rooms
A dimmer is a volume knob for atmosphere, and it’s one of the cheapest upgrades with the biggest payoff. Bright for meal prep, lower for dinner, a whisper for late-night tea—same room, three moods, one slider.
Pair dimmers with LED-compatible controls to prevent flicker and hum; not every dimmer plays nicely with every bulb. In living and dining rooms, split your circuits so ambient, task, and accent layers don’t rise and fall together. Bedrooms and media rooms especially benefit from low-level pathways and dark-friendly settings that won’t jar your eyes.
Style with Cohesion: Fixtures That Tell One Story
Lighting is jewelry for the home, and like jewelry, it can either pull a look together or confuse it. A minimal room saddled with ornate lanterns feels like a costume change mid-scene, while a traditional space peppered with ultra-industrial cans can read cold.
Choose a cohesive through-line—shape language, finish palette, era-inspired details—and let fixtures echo it without being matchy-matchy. Mix metals with intention (one dominant, one supporting), and repeat forms in subtle ways: a teardrop pendant over the island, a softer rounded sconce down the hall, a globe accent in the entry. Aim for tension, not chaos; contrast warms up minimalism and calms maximalism. Above all, honor your architecture. The house will tell you what looks right if you listen.
Don’t Ignore Energy and Maintenance
Energy-efficient options boost comfort and colour as well as bills. Modern LEDs produce strong lumens with minimal wattage, operate cool, and endure for years—perfect for hard-to-reach installations. Choose colour temperature carefully: warm white (2700K–3000K) makes living spaces cosy, while neutral whites (3000K–3500K) brighten kitchens and work areas without going blue.
Colour Rendering Index matters more than most realise. Paint, wood, and skin seem natural with a CRI of 90+, so spaces don’t feel flat. If you favour silent electronics, pair efficient sources with smart controls like timers, occupancy sensors in closets and showers, and circadian-friendly routines. Maintenance matters: sealed shower trims, wipeable kitchen shades, and quality drivers in integrated LED lighting keep things looking and working well.
Test Before You Commit: Mockups and Samples
Light behaves differently at night than at noon, and the shade you loved online can read totally different in your space. Before you lock in, stage a mini rehearsal.
Set up temporary plug-in lamps or clamp lights to simulate pendants and sconces so you can study spill, glare, and shadows at different times of day. Tape outlines on ceilings to visualize scale and spacing. Bring home sample bulbs in multiple color temperatures and try them against your paint and finishes. If you can, power a single run of under-cabinet LEDs and dim them to see how diffusion and brightness feel on your actual countertop material. A few low-stakes trials now will save you from living with a high-stakes regret later.
FAQ
What is layered lighting, and why does it matter?
Layered lighting combines ambient, task, and accent sources so a room feels balanced, functional, and dimensional. It prevents shadows and gives you control over mood and brightness.
How high should pendants hang over a kitchen island?
Aim for 30 to 36 inches from countertop to the bottom of the shade, adjusting for ceiling height, fixture size, and sightlines. The goal is clear views and even task light without glare.
Are all LED bulbs dimmable?
No—only bulbs labeled dimmable will work smoothly on a dimmer. Match dimmable LEDs with compatible dimmers to avoid flicker and buzzing.
What color temperature is best for most homes?
Warm white (2700K–3000K) flatters skin tones and creates a cozy vibe in living areas and bedrooms. Slightly cooler whites (3000K–3500K) can be great for kitchens and work zones.
How do I choose the right fixture size for a dining table?
A fixture about half to two-thirds the width of your table usually feels proportional. Keep 30 to 36 inches of clearance from tabletop to fixture for comfortable sightlines.
How can I avoid bathroom mirror shadows?
Place sconces at about eye level on either side of the mirror to light the face evenly. If using a single light above, choose a diffused fixture close to the wall to minimize harsh downlight.
Do I need under-cabinet lighting in a small kitchen?
Yes, even compact kitchens benefit from under-cabinet lighting because it eliminates counter shadows and makes tasks safer and easier. It also adds lovely evening ambience when overhead lights are dimmed.
What CRI should I look for in LED bulbs?
Choose LEDs with a CRI of 90 or higher to ensure colors appear natural and materials look rich. High CRI is especially important in kitchens, baths, and art-filled spaces.
Can I mix metal finishes in one room?
You can, and it often looks more layered and intentional. Stick to one dominant finish and one accent, repeating each at least twice to feel cohesive.
When should I involve an electrician in my lighting plan?
Bring an electrician in early if you’re moving junction boxes, adding circuits, or integrating smart controls. Early coordination avoids costly changes once walls close up.


